

Галерея для OpenCart із виведенням опису. За допомогою цього модуля ви зможете зробити гарне портфоліо чи галерею робіт для вашого сайту.
Висновок за допомогою шорткоду в описі товару, категорії, статті, новинах шаблону Unishop ( тільки у цих видах сторінок ).
Переваги:
- можливість вставляти галерею в опис товару, категорії чи статті за допомогою шорткоду (за аналогією з WordPress)
- можливість ставити галерею у статті блогу для шаблону UniShop
- адаптивний дизайн (сітка bootstrap, а спливаюче зображення адаптується під розмір екрану)
- 3 варіант відображення: Плитка, Карусель, Кам'яна кладка (Masonry)
- налаштування кількості колонок зображення (1, 2, 3, 4, 6 та 12 колонок)
- адаптація під мобільні пристрої (для 4х дозволів екрану можна вибрати потрібну кількість колонок)
- 5 варіантів анімації при наведенні
- виведення галереї як окремої сторінки, так і в будь-якій іншій частині сайту у вигляді модуля
- модуль поєднує в собі галерею та банери, які можуть вести на будь-яку сторінку сайту
- підтримка відео youtube та vimeo у спливаючому вікні
- можливість додати кнопку "Показати ще", щоб не перевантажувати сторінку з галереєю
- можливість масового завантаження фото
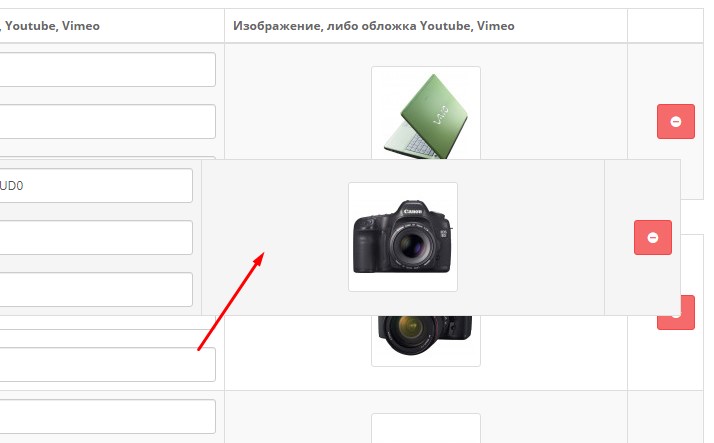
- сортування зображень перетягуванням
- опис зображень з візуальним редактором та підтримкою html
- кожне зображення може мати унікальний дизайн опису.
- модуль використовує скрипт, який вже є в опенкарті, таким чином не перевантажуючи код сайту
- кілька анімацій появи зображення
- три варіанти розташування тексту: під фото, на фото при наведенні миші та на фото завжди
- можливість додати рамку до фотографій
- можливість виведення заголовка у кожної галереї
- можливість додавання атрибутів title та alt до кожного зображення
Встановлення модуля
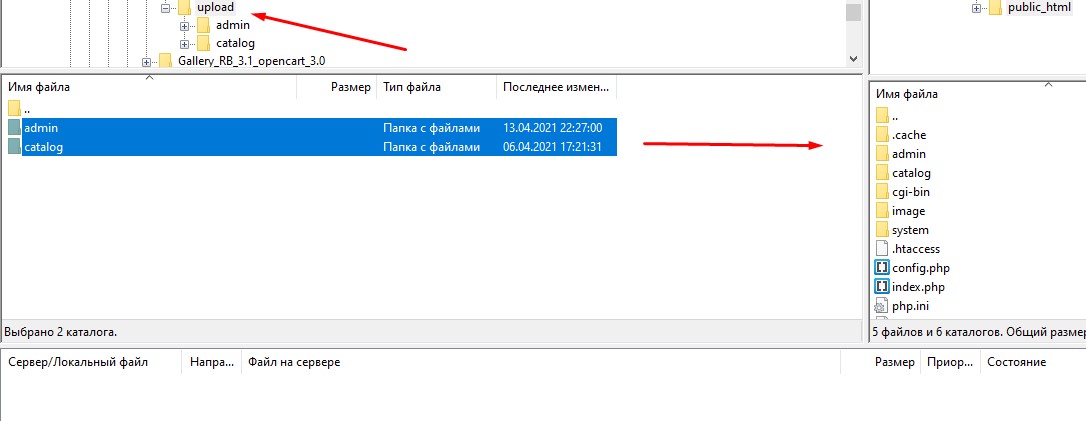
- Скопіюйте вміст upload папки в папку вашого сайту. У разі питання про перезапис файлів виберіть "Пропустити" для всіх файлів. У модулі містяться файли ckeditor, magnific popup та jquery ui для тих версій опенкарти, де їх немає.

- В адмінпанелі сайту в розділі Доповнення / Модулі навпроти Gallery RB, що з'явився, натисніть кнопку "Встановити".
- У розділі Модулі (Розширення) / Налаштування розширень завантажте файл gallery_rb.ocmod.xml (для opencart 2.x) або gallery_rb.ocmod.zip (для opencart 3.x) з папки модуля. Для версій Opencart 2.1 та 2.3 у розділі Система/Налаштування у вкладці ФТП мають бути вказані доступи до ФТП. Це розширення необхідне виведення модуля з допомогою шорткоду у описі товарів, категорій чи статей.

- У розділі Модулі / Модифікатори оновіть кеш модифікаторів.

- Модуль встановлено.
Налаштування галереї
- У модулях натисніть значок редагування галереї навпроти Gallery RB. Відкриється сторінка налаштувань модуля.
- Вкажіть розмір попереднього зображення. Модуль у будь-якому випадку розтягне, або візуально стисне картинку, до ширини колонки. Ширина прев'ю у вас повинна дорівнювати приблизно ширині колонки галереї. Цей параметр не дозволяє регулювати відступи між зображеннями.
- Для тексту на зображеннях можна встановити фон та прозорість цього фону.
- У самому низу сторінки ви можете додати зображення для вашої галереї, додати до них опис (використовуючи візуальний редактор)
- Галерея може працювати як фотоальбом, при натисканні на мініатюри будуть розкриватися великі фото. Але якщо ви вкажете посилання на іншу сторінку сайту або взагалі інший сайт у налаштуваннях галереї, то при натисканні на сайт відбудеться перехід на цю сторінку. Таким чином, галерея може працювати як банери. До зображень можна додати посилання на youtube, vimeo. Відео буде відриватися у спливаючому вікні. Посилання на відео повинні мати такий вигляд: https://www.youtube.com/watch?v=1i3QLck0UD0
https://vimeo.com/421877934

- Порядок сортування для зображень можна встановити перетягуванням блоків з фото.

- Змініть статус на "Увімкнено" та збережіть галерею.
- Галерея успішно створено. Тепер ви можете розмістити її в будь-якому місці вашого сайту в розділі Дизайн / Схеми (Макети), як і будь-який інший стандартний модуль Opencart.
Або додана в опис товару, категорії або статті за допомогою шорткоду (тільки у вказані місця на сайті).
1. Галерея як модуль (наприклад, категорії)
- Ви можете розмістити галерею в будь-якому місці вашого сайту в розділі Дизайн / Схеми (Макети), як і будь-який інший стандартний модуль Opencart.
2. Галерея як окрема сторінка
- Перейдіть до розділу Дизайн / Схема (Макети) та натисніть "+" праворуч зверху щоб створити нову Схему (Макет)
- Дайте назву вашій схемі (макету), наприклад "Галерея"
- Далі виберіть розташування модуля, наприклад, Внизу сторінки
- Перейдіть до розділу Каталог / Статті та додайте статтю. Налаштуйте заголовок вашої сторінки і, якщо потрібно, додайте опис
- У вкладці Дизайн виберіть схему, яку ви створили раніше
- Таким чином, можна створювати безліч галерей з різним дизайном.
2. Додавання галереї за допомогою шорткоду
- Галерею можна додати безпосередньо до опису наступних сторінок: товар, категорія, стаття.
- Після того, як ви створили галерею, збережіть її.
- У полі Шорткод з'явиться код для вставлення в описі сторінки.
- Скопіюйте цей код та вставте в опис сторінки.
Візуальний редактор
Ви можете налаштувати виведення заголовків і слоганів, що привертають увагу, на ваших зображеннях. Для просунутих користувачів можна додавати довільний html-код і стилізувати текст на свій смак.Характеристики доповнення
PHP
7.2-7.4Сумісність
OpenCart 3, ocStore 3Локалізація
українська, російська, англійськаOcmod
НіВідгуків: 0
Відгуків про цей товар ще не було.
Запитань: 0
Поки немає запитань про цей товар. Станьте першим!
Інструкція з встановлення модуля:
- Перед тим як виконати будь-які дій щодо встановлення доповнення в Opencart, ми рекомендуємо створити резервну копію всіх файлів сайту та бази даних магазину;
- Встановити фікс localcopy (якщо він у вас ще не встановлений)
- Завантажте файл модуля для потрібної версії Opencart з нашого сайту (Дотримуйтеся інструкції зі встановлення якщо така є в архіві з модулем);
- Потім перейдіть до розділу "Встановлення додатків/розширень" та натисніть на кнопку "Завантажити";
- Виберіть завантажений файл і дочекайтеся повного встановлення модуля та появи тексту "Додаток успішно встановлено";
- Після того перейдіть в "Менеджер додатків" та оновіть модифікатори натисувши кнопку "Оновити";
- Піля цих дій потрібно додати права на перегляд та керування модулем у розділі "Групи користувачів" для адміністратора, чи інших вибраних вами користувачів, натиснувши "Виділити все"
Схожі товари


![[TRD] SDLayout - Мікророзмітка Schema.org + Open Graph [TRD] SDLayout - Мікророзмітка Schema.org + Open Graph](https://opencart-hub.com/image/cache/catalog/products/SEO-Prosuvannya/[TRD]-SDLayout-Microlayout-Schema-org-Open-Graph-220x230.jpg)


